Saturday, April 28, 2012

Cinco De Mayo Door Decor

Keeping with my goal to have a wreath for every holiday....ok....so this isn't  much of a ''wreath'' per say, but it goes on the door so close enough!

I found a red, black, and light grey striped rug at Dollar Tree that instantly made me think of a poncho.  So I bought it and colored in the grey stripes with green marker to make it more colorful.


Next, cut out a bottle type shape out of cardboard. 


Fold your rug over the sides near the "neck" and hot glue it down


I also bought a package of cut out from the dollar store.  I glued cardboard pieces onto the back of the sombrero to give it support, then glued that to the neck of the board.


I hot glued a pop tab onto the back as my hanger


Then I just glued on a foam mustache, the guitar cut out, and some maracas.  Done


Yep.  It's cheesy, but what can I say?  I like cheese.
 

Tuesday, April 24, 2012

York Peppermint Cookies

My boy has been having a rough couple of days at work and I thought he was in desperate need of a small pick me up.  So I thought a freshly baked batch of cookies would be a nice surprise for him to wake up to.  And for the record....he wakes up for work at 11PM so cookies are totally allowed at that time!

I went with the York Peppermint Patty pieces because...well....they were near the register when I was leaving work. Haha I like when life makes decisions for you.  Otherwise I would have been in severe anguish trying to decided what flavor of cookie to make him.  I'm totally one of those people who has a clear set opinion and decision on the big things in life.....but the small things will stress me out to the point of shit cramps.  Asking me where I want to eat is the all-time worst question ever to ask a non decision maker like me.
Anyways.....

York Peppermint Cookies it is!  All I did was use my old standby M&M Cookie recipe and swap out the M&Ms for the York Pieces.  With all the cool flavors they have now like Almond Joy Pieces you can come up with whatever flavor cookie you like! 


Start by creaming together your shortening and sugar.  You could certainly use butter if you prefer but I almost always use butter flavored shortening when I bake.  I love that you get the flavor of butter but the convenience of shortening for a lazy....errr....I prefer impatient, girl like me.  I hate having to remember to pull out butter earlier in the day to get it to the right temperature.  Then, since I have forgotten and I want to bake NOW I try to speed it up in the microwave and over melt it and that makes for a crappy cookie!  OR it could go the completely  other way.  I could remember to pull out the butter but since I live in AZ (also known as the Swamp Ass State)  it gets melty after sitting on the counter for more than 10 mins.  Using shortening takes all the pressure off!  And it gives a texture that I absolutely love!

Really cream it together well.  I know I mentioned this in another post but I think it's important enough to bring up again.  I used to just barely mix the two together, but that is allllll wrong! You want your mixer to run for a few minutes.  Let it get nice and fluffy.  You're looking for whatever your creaming to get lighter.  No matter how the color is starting off depending on your ingredients.....brownish.....yellowish...... you want it to get alot lighter in color....and fluffy.....don't forget fluffy!

Did you get that it should be fluffy?
Then mix in your eggs and vanilla.  Mix the dry ingredients together and then add it to your wet ingredients and mix well.  Add in your "Pieces" and just barely stir in so they don't get broken up.  You can reserve some if you want to stick them on top for presentation.  You can makes these as either drop cookies or you can roll them into balls.

I prefer to roll them.  Bake at 350 for 9 mins.  I guess if you want to get technical you COULD cook them longer, but I have a strict personal 9 minute rule.  I never bake any cookie past 9 minutes....or maybe 10.  I like a soft cookie...sometimes even gooey! Mmmmm.  But if you are a crunchy girl you could cook these up to 11, 12 minutes.


Candy Cookies

2 1/2 C. Packed Brown Sugar
1 C. Butter Flavored Shortening
2 Eggs
2 Tsp. Vanilla
2 1/2 C. Flour
1 Tsp. Salt
1 Tsp. Baking Soda
1 1/2 C. Candy of choice

Cream together shortening and sugar.  Add in eggs and vanilla.  Combine all dry ingredients and add to wet ingredients.  Mix well.  Carefully stir in candy as to not break them up.  Reserve some to press on top if you wish.  Drop by spoonfuls or roll into balls.  Bake at 350 for 9-12 minutes.

I always make my cookies on the small side.  A sort of 2.5 biter for the average sized chick mouth.  A guy could probably inhale 2 at once.  I yield about 36 smaller cookies.  I HATE how recipes always tell you that you will get 72......because who the hell EVER DOES?  Seriously??? You have to be making some Barbie sized cookies to get 72 out of one batch!

Saturday, April 21, 2012

Incorporating Your Pet Into Your Wedding

Meet Mo Mo


Mo Mo is the love of my life....next to my husband of course....but she did come first.  In fact when we were newly dating he used to get jealous and say I gave her more attention.  Then he moved in and discovered the love that is Mo.  Can't blame him really....he'd never had a pet before so he didn't know the love of a child. 

Now they are two peas in a pod.


Considering how in love we both are with her, it would seem wrong to not have her included in our big day.  Like I said in a previous post, in my delusional dream world she would have jingled down the aisle as a flower girl.  But you know that phrase about herding cats?  Yep.... that phrase exists for a reason.  Homegirl can't be told what to do!  She do what she want!

Years ago I tried to train her to walk on a leash but she would just lay down.  So I tried following the directions that said to just hook the leash on and let them walk freely or lay and sleep with it on just to get them gradually used to it without you holding the other end.   Well that didn't work out either.  Mo  is a mostly indoor cat.  She goes outside to go to the bathroom and sun herself for a few minutes and then comes inside.  Somehow within the span of an hour she lost the crap out of that leash!  I searched EVERYWHERE!  It was hot pink and glittery ....not exactly discreet.  I searched the entire backyard and up and down the street.  She's no dummy....she made sure that thing would never be found.  Mo Mo had spoken.

Anyways, so her walking down the aisle was not an option but she still needed to be represented.  So here are the things that I came up with


On my bouquet I had a little silver kitty charm (and a cupcake....but that's another story)  We also had a little stuffed kitty that looked like her.  I had one of my flower girls carry her down the aisle


I painted a little ceramic bobble head that we hid on a table of decorations as you walked into the reception


Also hidden amongst the candy buffet


A picture frame on the bar


And a Mo Mo mask that I made for the photo props basket


I missed her so much that when Tim and I ran home to change really quick before the after party the first thing I did was run in and kiss her.  Hubby snapped this picture of us.


What can I say?  I guess we're crazy cat people

Friday, April 20, 2012

Wedding I Spy Game

No matter how well timed your reception may be, and I do have to say my DJ did an impeccable job  of moving things along, there is the inevitable lull.  Whether it's because your waiting to hit the buffet line, you don't feel like doing the cha cha slide, or the only person you know at your table just went to the bathroom (been there!), I wanted to add something on each table that would be interactive.  Even if it just gave the guests something to read for a minute. 

So I decided to do an I Spy game.  At the very top it reads....


Use your camera, look around
Hunt for the pictures that need to be found
Shoot away, complete the list
Find the moments we may have missed 

It really served two purposes.  It also got people to take pictures of things we wanted to see.  I put general things like "An artistic shot of your dinner" and "Something sparkly"  but I also had some personalized ones like "Look for the hidden Mo Mo references"  

Mo Mo is our beloved Kitty.  We tried to incorporate her into the wedding as much as we could without actually having our baby there (although in my dream world she would have walked down the aisle with me)
I have to admit one of the main reasons I added that line in was because I felt like I put alot of work into giving her a nod so damn it I wanted people to notice!  Is that too much for a crazy bride to ask?  I didn't think so!  Haha

I printed the lists onto cardstock and then matted them on a contrasting piece of cardstock.  I placed one at each table.


Along with that I put a photo share card at each place setting.  I created a shutterfly account and printed the information (ID and password)  onto business cards that I made using Vistaprint.  You could also just use an email address and have them send the pictures to it if you want to take an easier route.  I wanted to create an account so they could see what other people left as well.  This way they could send the pictures from the game or any pictures from the whole night. =)


It was fun to get peoples pictures and see it from different points of view


Tuesday, April 17, 2012

Mexican Smothered Chicken

For all my wonderful and devoted readers out there.......can you sense the sarcasm?  Seeing as how at this point my only 2 followers of this blog are 2 of my sisters.  I guess I couldn't even hook the 3rd one haha  ;)  Anyways, for all my wonderful and devoted readers out there, I give to you a three in one recipe post!  Sort of like going to the bathroom and checking your facebook...it really makes it worth your time!


Chicken Marinade

1 C. Teriyaki glaze
2 C. Water
1/2 C. Tequila
3 Cloves minced garlic


Marinade chicken overnight.  On this particular day I marinated it for about 30 hours and it was delish!  This is enough marinade for about 6 pieces of chicken.  I actually started off with 4 chicken breasts but I pounded them out thin and then cut the large ones in half so I ended up with 6 in the end.
I have a "thing" about thick white meat.  It sorta skeeves me out.  I feel like I'm eating chickeny, proteiny string cheese.  Bleh!  So I almost always pound my chicken out since these days we inject them with so many damn hormones they all seem to have DDs!

Grill it up and this would be an amazing dinner as is! The chicken becomes so juicy and tender and you can actually taste the hint of tequila.


But like I said, this is a 3 in 1 recipe so.....

Grill your chicken until almost done but just a little under since it will be going back into the oven.  This brings us to.....

Recipe #2

1 C. Mayo
1 C. Sour Cream
1C. Thick & Chunky Salsa
1 Tb. Dill
1 tsp. Cumin
2 Tb. Tabasco  (I like a kick but you could use less)


You can use this sauce cold by itself as a dip that I refer to as "Zippy Dip"  Great with veggies or potato chips.  If using it as a dip I suggest making it ahead of time an letting it sit in the fridge.  It thickens up for optimum  "dipability." 


Place your parcooked chicken in a baking dish.  Smother your chicken (thus the name) with every drop of this sauce!  No skimping allowed! Top each piece of chicken with shredded cheddar.  Bake at 350 for about 20 minutes until the sauce it bubbly, the cheese is melty, and the chicken is cookie?  Cookied?.....Cooked.

Here it is straight out of the oven


When I serve it I add extra sauce from the pan on top.  And you know what else is divine?  Having this chicken with spanish rice with some of the sauce mixed into it.  Freakin uh-mazing!


It's cool how different the sauce becomes once it's heated.  It gets darker and more orange in color and the flavor just completely changes.

I hope you try at least one of these recipe alone or put em all together for this (not so) Mexican Smothered Chicken

Sunday, April 15, 2012

Poor Girls Skinny Margarita

I'm a huge fan of Bethenny Frankel and her line of skinny cocktails.  My favorite has to be the original.....the Skinny Girl Margarita.  I like to buy a bottle when I'm showing up to someones house because its just easier to have it premixed for a crowd.  But for here at home, $10 a bottle can get expensive the way I slam it!  And have you seen the cost of limes these days? Holy balls! Making it from scratch is rarely on option with those prices.  So here is my poor girl version of this cocktail.


Please don't judge me for my tequila.  Haha I have 4 bottles of Cuervo left over from my wedding that need to go first before I can get some good stuff.  

The key to making this poor girl friendly is the key lime sparkling water.  This is Kroger brand but pretty much every grocery store sells their own brand of this.  This bottle cost me 98c which is awesome!    Mixed with a little triple sec you have yourself a delicious cocktail on the cheap!  And since it's cheap you can drink more....and more....and a little bit more.  =)

Thursday, April 12, 2012

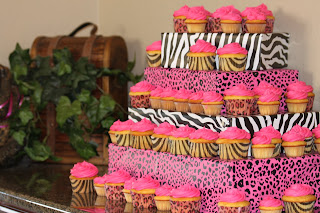
DIY Cheap and Easy Cupcake Stand

There a ton of different options for displaying cupcakes.  You can buy the stands but I find them to be expensive and they don't seem to hold that many for when you have a big crowd.  You can also build them out of wood but that can be time consuming. In the past I have also made them out of cake dummies and cake boards stacked, but that too was surprisingly expensive to a cheapo like me. My method here is great because it's quick, uses easy to find items, and it's CHEAP!

Start by collecting boxes that create a nice tiered look when stacked.  They don't have to be exactly the same height but you want them to be fairly close.  You will also need a roll of wrapping paper that goes with your theme.


You can wrap the boxes like gifts if you want it to be super quick but I want a cleaner look with no folds showing on the sides.  Here's how

Lay your box with the top side down.  Trace around it.  Then flip the box onto all its sides and trace them as well.  It will almost look as if you are "unfolding" the box


After you have traced the entire box you are going to add tabs onto the sides. These will allow you to fold them over the edge of the box to glue down the paper.  For the sides of the box that will be on the...well...side of the cupcake stand you are going to draw tabs on all 3 sides.  For the front of the boxes that will be the front of the stand (usually the longer side of the box if it's rectangle) you will only draw 1 tab.


Place your box top side down onto the square in the middle.  Fold the sides with 3 tabs (the shorter ones) up the sides of the box and fold the tabs around the sides.  You can either tape everything in place or use spray adhesive.  After you have done the sides you do the front and back with the 1 tab.  Repeat for all the boxes.

Dummy over here forgot to take a finished picture of this stand so here are some pictures of one I made for my bridal shower


I have taken the liberty to create for you a list of pros to using this cupcake stand method

*As previously mentioned....it's friggen CHEAP
*It's fast
*You can easily make it match any color scheme or theme of your party
*You can keep the same boxes and just keep recovering them
*If you do keep the boxes, they will store easily because they all nest into each other
*OR it's easy enough to find boxes you could just get rid of them and save new boxes from your latest trip to Costco

There ya have it folks!

Green Chile and Corn Chicken Salad

Everybody loves a good chicken salad and if you don't you're crazy! The only things is sometimes it can get a little dull.  This recipe will liven up your chicken salad repertoire.


You have your standard chicken salad ingredients like chicken (obviously), onion (I prefer red), and mayo. The green chile adds a little spicey flare and the corn takes the place of the grapes or apple in your more traditional recipes.  It still gives a little sweetness but in a more savory way.....if that makes any sense?

Actually, come to think of it this isn't much of a " recipe" at all.  I don't have any exact amounts because to me chicken salad is an opportunity to use leftover chicken so it really all depends on how much chicken you have.

Dice up all your ingredients and mix it all together until the ratio of ingredients seem right to you.  If you like it a little spicier add more chiles, if you like onions to the point of breathing fire like me...keep the onion coming!  You get the idea.

Add the mayo to bind it all together.  If you aren't going to be eating it all right away I suggest adding a little more mayo than you think you will need because the chicken does tend to soak it up.  Season with salt and pepper.  I also like to add a smidgen of cumin for a smokey flavor but that's entirely up to you.

Speaking of mayo, I have been putting that shit in everything these days!  Especially since I have been doing  a low carb diet periodically.  I feel like Marshall Erickson's family in How I Met Your Mother.   Remember the episode where they go home to his family for Thanksgiving?  Lilly is put in charge of making the Erickson family 7 layer salad.  It has layers like gummy bears and potato chips and 14 cups of mayo.  Hahah so classic

Here it is all mixed up


My favorite way to chow down on chicken salad is on some crispy crackers or on a buttery delicious croissant.