Showing posts with label Desserts and Baked Goods. Show all posts

Sunday, October 30, 2016

Basic Bitch Cake: Pumpkin Spice Crumb Cake

I'm guessing that at some point or another you have heard the term "Basic Bitch"  For those who haven't here is a rough idea


Basically...(ha!) It's a funny term to refer to girls who like all the same typical or "basic" things.  One of the running jokes and themes of being a Basic Bitch is how much they love fall and all things pumpkin


So when I decided to make a pumpkin spice version of my New York Crumb Cake and give it to The Boy to take to work I told him it was "Basic Bitch Cake".....and the name just kinda stuck.

The recipe just like my original crumb cake starts with a cake mix.  But instead of yellow I swapped it out to spice cake and subbed out some of the oil and eggs for pumpkin puree, added some extra spice and voila.


Basic Bitch Cake (Pumpkin Spice Crumb Cake)


1 Spice cake mix
3 eggs, beaten
2/3 C. Milk
1 C. pumpkin puree
2 tsp. vanilla
1 tsp. cinnamon
1/4 tsp. ground ginger

Crumb Topping

4 C. Flour
2/3 C. Brown Sugar
2/3 C. White Sugar
2 tsp. Vanilla
2 tsp. Cinnamon
3 sticks melted butter

Combine the cake mix, eggs, milk, spices, and pumpkin.  Beat until smooth.  Spread in well greased sheet cake pan.
Bake for 15 mins at 350.  Meanwhile combine all ingredients for crumb topping.  

After 15 mins pull cake out and let cool slightly.  Break apart crumb topping dough into large crumbs and cover the entire cake.  Bake and additional 15 mins

Let cool completely before serving


 Since we're on the subject of Basic Bitchiness.....I thought I would try and determine where I land on the Basic spectrum.  Let's see here....

Not sure if this counts or not but all my paperwares are Basic
I just wore jeans recently for the first time in MONTHS (meaning leggings are my go to), even though I currently only own a camping worthy pair, I love me some Ugg boots! (even more of a basic offense I have eve rocked the Eskiho look in years past)


I could talk all day about how much I love Disney and Holidays, and boots and a flannel shirt are a good look in my book.


But on the flip side....I have only had Starbucks once and have never had Dutch Bros coffee (I just can't get down with paying that much beverage that doesn't at least have booze in it....and even then I do 97% of my drinking at home anyway)

While I don't dislike pumpkin I don't go INSANE the way alot of girls do, and lastly....I don't like Beyonce or Taylor Swift (20something girls everywhere just got the wind knocked out of them and aren't sure why)

So where does that place me on a scale of 1-10?  I'm going to say I'm a solid 7 Basic Bitch.

Where do you land on the spectrum??

Tuesday, November 26, 2013

Double Crunch Pecan Pie

Pecan has always been my favorite Thanksgiving pie.  Always.  

But everything changed when I tried THIS pecan pie.  One of the three years that I sold pies I did it with my friend Jade.  I think she found the recipe in a magazine somewhere....I'm not really sure.  But over the years I've made a few small tweaks but not too many.  It really is the best pecan pie you'll ever have....I've been told this by many people.

In fact, one particular fan of this pie really sticks out to me.  When I was selling these pies a lot of my "clientele" if you will were my sisters coworkers.  One in particular was a Pharmacist named Jim.  Jim was one of those older gentlemen who even though he made PLENTY of money was always a cheap skate. After donating his car he walked to work because he didn't want to pay for a new one, he wore the same clothes for YEARS, and never wanted to pay more than $5 for anything.  That's why I think it's saying something that he was willing to shell out the $12 I charged for this pie (which actually isn't a bad price for all the pecans it contains) And he was always so grateful and excited when they were delivered

The thing that makes both Jim and I nuts over this pie is just that....all the nuts!  It has more than double the nuts of your average pecan pie.  You start off making it the same way you always do.  You have the corn syrup, sugar, egg goop and your chopped pecans.  You know how normally all the chopped pecans float to the top and form a crust?  Well in this recipe, right when that crust is forming you add pecan halves that have been coated in sugar and honey (almost candied) on top of that.  These pecan halves sort of force those pecan bits down a bit and settle them more into the goop.  That way each bite is FULL of pecany goodness!  A pecan pie lovers dream!!!


Here's a focus on those pecan beauties!


I don't know about you, but in my family pecan pie is ALWAYS served with a scoop of vanilla ice cream.  The "goop" of the pie is almost like a sauce for the ice cream.  It's butterscotch/caramel reminiscent.  And I LOVE LOVE pie crust with ice cream.  Yummm!

Double Crunch Pecan Pie

4 eggs beaten
1/2 c. Brown sugar
1/2 tsp. Salt
1 c. Corn syrup
2 tb. Melted butter
3 tsp. Vanilla
1 c. Chopped pecans


Topping:

1/3 c. Brown Sugar
3tb. Butter
3tb. Honey
1.5 c. Pecan halves

Combine eggs, sugar, salt, corn syrup, butter, vanilla, and chopped pecans.  Pour into pie shell and bake at 350 for 35 minutes.  Combine remaining ingredients in a saucepan over low heat a few minutes just before the 35 minutes is up.  Allow the sugar to melt and everything to evenly coat the pecans.  Top pie with mixture and bake an addition 10- 15 minutes.

Monday, November 25, 2013

The Best Pumpkin Pie EVER

So here's the story with me and pumpkin pie.  I loved it when I was little little.  

Random side note completely off topic.....isn't it funny how we repeat words twice for emphasis.  Like "little little" doesn't mean 9 or 10 little.  It means like say.....4...5?  And I think people generally understand that when you say that.  It"s like when you say you "like like" somebody.  That means winky like....like break me off a piece of that like.  And everyone knows what you mean simply by saying the word twice....just a funny thought.  Anyway.....back to pie making

So I loved pumpkin pie when I was little little.  I remember looking forward to it every year (along with my grandmas stuffing) Then, suddenly I didn't like it anymore.  More than just not like....I loathed it.  The mere smell of it would make me give the stink face. The look of it grossed me out with it's not quite pudding, not quite cheesecake texture.  Watching my cousins wolf it down on Thanksgiving would put me over the edge....and I don't know why.  Seriously, I have no idea what happened. It's not like I had thrown it up....that's usually what ruins alot of foods for people but that wasn't the case here.  And then I didn't eat it for years....like at least 12 years. That was until I had to make a billion of them when I decided to start selling them.  Then, through trying lots of variations I created a recipe that everyone loved....even me.  Now pumpkin pie still isn't my first choice on Thanksgiving.  I'm more of a pecan pie girl myself (and I'll be posting a bomb recipe for that soon too!) but no other pie compares in my opinion.  I will never eat any other pumpkin pie again in  my life.....ok maybe.....but highly unlikely.

You can reference my Thanksgiving pie tips post for tips on how to easily make your pie crusts.  Then use this recipe below for the filling


The Best Pumpkin Pie EVER!

1 3/4 C. Pumpkin (15 oz can)
15 oz. can Sweetened condensed milk
2 Eggs beaten
2/3 C. Brown sugar
2  1/2 tsp. Cinnamon
1/2 tsp. Salt
1/2 tsp. Ginger
1/2 tsp. Nutmeg
!/4 tsp. Clove

Mix all ingredients together.  Pour into crusts.  Bake @425 for 15 minutes.  Reduce heat to 350 and bake for another 30-40 minutes or until the middle is set. (for me it is usually done by 30 but every oven is different)

* Makes enough filling for 1 1/2 - 2 pies.  I usually double the recipe and make 3 very full pies


* Don't be afraid to adjust the spice to YOUR taste.  I like a lot of cinnamon..you might like less. Or maybe you like more clove etc.  Taste you're batter and adjust.  If you are hesitant of eating raw egg add all your ingredients but your eggs so you can taste.  Once it is to your liking stir them in


Sunday, November 24, 2013

Thanksgiving Pie Tips

Back in my hustling days I used to sell food sometimes at Holidays.  Three years in a row I sold homemade pies and pumpkin rolls....and I will never do it EVER again if I can help it. But in those 3 years I baked hundreds of pies and picked up a few tricks along the way that made the whole process a little easier.  So as an ex pie slinger I present to you my......


Tip #1:  Use shortening

I know, I know....normally I'm a big believer in "butter makes everything better" I'm sure Julia Child just rolled over in her grave as I type this but this is one case in which I have to suggest skipping the butter and using shortening.  I like to use the butter flavored shortening because it gives me the best of both worlds.  Shortening is just easier to work with, a little more fool proof, and honestly in my experience actually yields a more flaky crust.  Not to mention it can be cheaper in the long run

Now you might be wondering....what recipe do I use?  You can use your tried and true if you have one and just use shortening in place of the butter.  I actually lost the recipe I had been using for years.  You would think I would have it memorized but I don't. I think I'm mentally blocking out the long nights of no sleep, pies stacked in boxes as far as the eye can see, and me shaking and on the verge of puking from exhaustion.  Not exactly fun so times like that will make you forget a simple recipe.  So this year I decided to google Ree Drummond's (The Pioneer Woman) recipe because I love her and I assumed her recipe would be good and whaddya know.....she also insists on shortening herself.  Great minds think alike! 

Here is the link to her recipe....I really liked it http://thepioneerwoman.com/cooking/2007/12/p-p-p-pie_crust_and_its_p-p-p-perfect/

Tip #2 Don't work with super duper cold dough

Yet another thing you've probably heard over and over when it comes to pie making is that it should be super cold.  I disagree.  Yes, you don't want things to start melting and cause a sticky mess but where most recipes have a standard rest time in the refrigerator or even freezer before you even think of touching it.....I prefer to start rolling right away.  If you start with cold ingredients (ice water and chilled shortening) I don't think it's  necessary.  I will put any dough I am not currently rolling in the fridge but like I said....no rest/chill beforehand.  I find super cold dough harder to work with as it is harder to roll and cracks more

Tip #3 Wax paper is your friend!!

I roll all my dough out sandwiched between 2 pieces of wax paper.  I know some people use gallon storage bags...but I'm cheap and wax paper costs less and when I was making dozens upon dozens of pies a year it was just more economical


You can put a little flour down on he dough if you are afraid it will stick.  As long as you don't make your dough too sticky you should be able to peel off the top piece of wax paper just fine.  Then place your pie tin right on top 


Flip the whole thing over and then peel off the other piece of wax paper.  This is the best method I have ever found for transferring the dough to the pan.  On the cooking shows you always see them roll it up on their rolling pin and unroll it back out over the pan......that has NEVER worked for me.

And this scene in Snow White is like the biggest lie of my childhood.....who just picks up pie dough like that????

http://youtu.be/FW_4q905XZw

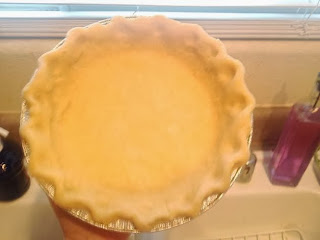
Anways......it will look like this.  and see that little tear?  No biggie!  Just patch it up with excess dough on the sides


Then do your crust however you prefer whether that be cutting off the excess dough, rolling it in, fluting, or crimping.  Whatevs!  I've never been a good fluter.....you would think I would be by now but that always look pretty sad.  I just say they look "rustic".....that works right?


Now brings me to.....

Tip #4: Make them ahead of time and freeze

You have enough going on the day or two before Thanksgiving that you don't need to burden yourself with making your dough right then.  What I do is make them and then set them in the freezer to freeze on their own first.  When they are close to or completely frozen I stack them up with either wax paper, parchment, or freezer paper between them


Then you can either wrap them in plastic wrap like this


Or in the past I have even just wrapped them in a few layers of grocery bags and tied them up....worked just as well.  I have made all my crusts up to 2 weeks ahead of time just like this.  that way when you are ready to bake you just pull them out of the freezer, fill, and bake.  All the ease of store bought frozen crusts but from scratch....you can't beat that!

That brings us to our final tip

Tip #5  Save those scraps!

Save an scrap dough and roll them out to create cute edible decorations for your pie.  I have a set of fall cookie cutters I always use


Bake them separately and then place them on top of your baked pie....it really completes the look a


That completes my list of tips.  I hope some of these come in handy for you.  Now go forth and bake!

Monday, October 28, 2013

Candy Corn Cupcakes

I just haven't had it in me to make a cake of any kind lately.  So when one of my friends asked if I could make one for her daughters birthday/ Halloween bash I quickly asked if cupcakes were ok....luckily she goes with the flow and said that was totally fine.  Whew!

I got really excited over the idea of making them look like candy corn.  I love everything about candy corn.....except how they taste.  I guess that means I just think they're cute....cuz I do.

They're as easy as you would imagine they are.  Just have 3 different colors of frosting.  Yellow, orange, and white.  Pipe it on gradually moving inward and that's all there is to it


In case your looking for a yummy flavor for your cupcake I made these using my orange creamsicle cake and my coffee creamer buttercream

Happy Halloween!

Thursday, October 17, 2013

Low Carb and Gluten Free Chocolate Chip Pecan Cookies

I was never much of a sweets kinda gal before....but for whatever reason I have the biggest sweet tooth lately and urge to bake.  My sister insists it just comes with the season and I'm gonna go with that logic

I was craving cookies....even weirder because they were NEVER my sweet of choice....but I decided to wing it anyway.  I kind of threw some stuff together and hoped for the best.  I was happy when at least the dough itself was delicious because then even if they didn't bake up well I would still have something to eat that was cookieish


The good news is.....they worked!  A big accomplishment for me because developing baked goods recipes can be so hit or miss and I rarely develop them

The texture was sooooo good.  A little more crumbly than a regular chocolate chip cookie, but not in the sense that it falls apart easily, just soft. I would say they resemble the texture of an oatmeal cookie.  Then they have the chocolatey taste of your chocolate chip cookie of course....and then there's a third layer of awesomeness.....nuttiness!  I added chopped pecans to the recipe because I love them but the pairing of the chopped pecans with using almond flour in the recipe also gives me hints of pecan sandy cookies.  So this one little low carb cookie gem is like a hybrid of an oatmeal, a chocolate chip, and a pecan sandy.....and I will gladly say yes to that!

A think a big part of why these taste so good is because I put molasses in them.  I know what you're thinking.....Say what now?  Molasses is sugar....evil to the low carb diet!  Let me explain.....

In my pre-LC days I baked exclusively with brown sugar.  Even if a recipe called for a combination of white and brown or even just white sugar I ALWAYS substituted with all brown sugar.  I just really love what it does for baked goods.  To me it adds such flavor beyond just "sweet"   Since I always use brown sugar in my chocolate chip cookies I wanted to mimic that in my LC version too. 

I looked it up and there are brown sugar free substitutes you can buy....but I'm cheap and wasn't about to wait to get some.. I needed cookies NOW!  So since brown sugar is just white sugar with molasses added to it and I had a jar of molasses in my cupboard I just threw 1 tablespoon of it into the recipe.  Yes, 1 tablespoon has 16 carbs in it....but once you divide that out over an entire recipe it's not adding much to your carb count at all but it adds TONS of flavor.  Those carbs are worth it in my book 

One other thing to note in this recipe is that I quickly realized a few minutes into baking that they do not spread much on their own.  So after you scoop your dough press down on them lightly or do it after they've been baking for a few minutes but aren't so hot you can't touch them

In this picture you can see I've pressed the ones in the front


Here's the recipe...go make them ASAP!  They were approved by my sugar fiend of a niece...I think that's saying something!


Low Carb and Gluten Free Chocolate Chip Pecan Cookies

1 stick softened butter
1 cup stevia or sugar substitute of choice
1 tb. molasses
2 tsp. vanilla
1 egg
1/4 tsp. salt
1/4 tsp. baking powder
2 1/2 cups almond flour
1 cup. sugar free chocolate chips or  very dark chocolate (the darker it is the lower in carbs) chopped
1/2- 3/4 cup of chopped pecans (optional)


Cream together butter and stevia until fluffy.  Add egg, molasses, and vanilla and mix well.  Mix together dry ingredients and slowly add to wet ingredients until dough forms.  Stir in chocolate chips and nuts.  Refrigerate dough for at least one hour.  Scoop onto parchment lined cookie sheet or use a silpat. Gently push down on the scoops of dough as it does not spread much on its own when baked. Bake at 350 for about 8-10 minutes or until you reach desired doneness

Yield 20 cookies or 40 mini cookies

* I always make my cookies "mini"  using a rounded 1/2 tb. scoop


Tuesday, October 8, 2013

DIY Halloween Cupcake Toppers- Fondant Bones and Dracula Teeth

This is a repost.   I made Monster High Cupcakes for my niece's birthday party this year but I wanted to show you some of the homemade toppers again because they work perfectly for Halloween! 

Like these bone toppers


Cute right?  And look how easy they are

Just roll out little ropes of fondant


Cut in the sides a little


And roll them inward to create your bone shape.  voila!


Here is a SUPER old picture that is crappity crap crap quality....because it's from like 2 phones ago...but you get the idea.  And the spiders are just cheap rings


Now for Dracula teeth.  Cut lip shapes out of red fondant.  I made a paper template so they would be somewhat close every time.  Make an indent in the middle


Attach slightly curved triangles as the fangs


That's it!  Everyone will love them at your Halloween gathering this year and think that it came from a professional bakery

Sunday, October 6, 2013

Low Carb Almond Butter Cookies

I don't know what the deal is lately....I'm not normally much of a sweets kinda gal.  Way before I even started living a low carb lifestyle....It just wasn't my thing.  I rarely craved or even ate sweets.  

That's why it's extra weird that recently I want sweets more than I ever have in my life.  And that's forced me to start experimenting with making my own LC versions which I'm actually having alot of fun doing.  I never thought I would get into LC baking....I thought I would leave that to my sister..but here I am!  

I've seen alot of sugar free recipes for peanut butter cookies out there...all very similar.  I tweaked it a bit and subbed almond butter.  Here's what I came up with


Low Carb Almond Butter Cookies 

1 cup Almond butter (I used crunchy)
1 cup Stevia (or sweetener of choice)
1 Egg
2 tsp. Vanilla
1/4 tsp. Salt
2 TB. Coconut flour

Blend all ingredients together in mixer.  Form into walnut sized balls and place on a parchment lined baking sheet. Use a fork to flatten the balls in a criss cross pattern.  Bake at 350 for 9 minutes  Yield 12 cookies


They aren't super sweet....but I like that.  you could add more sweetener if you like.  But they come out nice and chewy....just how I like my cookies.


Enjoy!

Thursday, September 26, 2013

Orange Creamsicle Jello

I first made a similar version to this jello when I was doing my Low Carb 5 Day Fat Fast.  In that version I just made sugar free jello with cream cheese in it and then topping with fresh whipped cream to get lots of healthy fats in a low carb dose


I ended up liking it so much that even after my fast was over I needed to make more.  This time I stepped it up just a tad more by substituting the cold water in the jello for orange creme flavored sparkling water


All you do is whisk in a block of cream cheese to the boiling water with the gelatin (it's easier if the cream cheese is softened already) until it's nice and creamy.  Then add the cold sparkling water and pour it into a pan to set like normal


It's kind of cool because even though  you mix the cream cheese in well it will always rise to the top when it cools so you get 2 layers of jello. Regular and creamy.  You can see in the picture below.  Top with whipped cream and you have a delicious dessert or snack


Thursday, May 23, 2013

How to Make Ice Cream Cake Cupcakes

My niece Katie just turned 14 on Monday....yea....she's getting old!  My little buddy is getting all growed up and stuff :'(  Here's a picture collage I posted on Instagram


It's hard for me to even fathom the idea that she will legally be able to start driving a car in one year and 7 months.

Not that she should....she kinda goes into complete spaz mode in any kind stressful situation so god knows what would happen to that girl in traffic.  The point is though she legally COULD drive relatively soon....and that's just plain weird!

Anyway....all the men of the family went away this past weekend on a testosterone filled man camping trip.  It of course included beer, guns, off roading, and the pungent smell of man feet filling the camper.   

Us wives were so bummed to miss out...(yeeea....bummed) so we had to have our own fun.  We had a chickfest weekend which included mounds of sushi, drinks, pool time, and of course a little birthday celebration for Katie

After giving her some ideas she decided on ice cream cake cupcakes as her dessert

They're really quite simple

Start by spooning a tablespoon of the cake mix if your choice into your cupcake liner.  I used silicone liners but traditional paper ones work just fine


Bake about 12-15 minutes or until done and let completely cool

Then scoop softened ice cream (we used mint chocolate) on top of the cake and smooth.  You want it to come up to the top of the cupcake liner


Put in the freezer until solid

Then pipe on your whipped cream and topping of choice and put back in the freezer to set up the cream

That's it!


You get the best of both worlds.....and no cutting and scooping required!  It would be great for a kids party and make your life alot easier.


Monday, April 8, 2013

Monster High Cupcakes

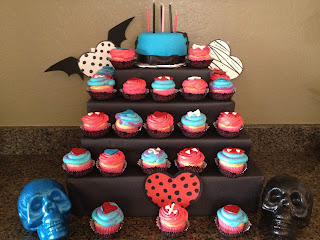
When Brooke's birthday rolled around I know a tiered cake just wasn't happening.  I just wasn't feeling up to it at all.  So I decided on cupcakes.  

They did still take up quite a bit of time because I made individual cupcakes toppers out of fondant....so lots of detail work.  But the beauty of it is unlike a cake one little mistake can screw up the cake majorly....with cupcakes it's not like that.  You just scrape off the top and start that ONE over instead of trying to find a way to cover up or fix the whole cake

I iced the cupcakes in blue and pink buttercream and then I made 4 different topper designs


First up.....red hearts with black polka dots


I cut hearts out of red fondant and used a black food color marker to line the edge and make the dots


Next is the blue heart with stitches 


Now for Dracula fangs

I made my own lip template and used the fondant tool that looks like a little spatula to make the indentations


And added in some fangs


And last but not least.....bones

Roll out little ropes of white fondant


Cut into the sides


And roll those pieces inward to create the bone shape


I made one mini cake with a bow and stitches to reprsent "Frankie Stein" which is who my niece dressed up as at the Party


To make the mini cake a little cuter I used pink frosting in the middle so it would be blue and pink when you cut it


Cupcakes were also a nice break from having to slice and serve.  Just scoop some ice cream and send them on their way