Pages

Wednesday, November 27, 2013

Wardrobe Wednesday- Lazy Saturday Outfit

Not every outfit here on Wardrobe Wednesday is going to be breaking fashion barriers. Actually, let's face it.....most don't. But this week isn't anything special. Just a lazy, rainy, Saturday where I wanted to feel comfortable but not like a complete schlub. I was going for a half schlub look.


Cardigan: Forever 21
Boyfriend Tee: Target
Scarf: Walmart
Shoes: Walmart Kids section

And this outfit did just that....I was comfy as hell!
 

Tuesday, November 26, 2013

Double Crunch Pecan Pie

Pecan has always been my favorite Thanksgiving pie.  Always.  

But everything changed when I tried THIS pecan pie.  One of the three years that I sold pies I did it with my friend Jade.  I think she found the recipe in a magazine somewhere....I'm not really sure.  But over the years I've made a few small tweaks but not too many.  It really is the best pecan pie you'll ever have....I've been told this by many people.

In fact, one particular fan of this pie really sticks out to me.  When I was selling these pies a lot of my "clientele" if you will were my sisters coworkers.  One in particular was a Pharmacist named Jim.  Jim was one of those older gentlemen who even though he made PLENTY of money was always a cheap skate. After donating his car he walked to work because he didn't want to pay for a new one, he wore the same clothes for YEARS, and never wanted to pay more than $5 for anything.  That's why I think it's saying something that he was willing to shell out the $12 I charged for this pie (which actually isn't a bad price for all the pecans it contains) And he was always so grateful and excited when they were delivered

The thing that makes both Jim and I nuts over this pie is just that....all the nuts!  It has more than double the nuts of your average pecan pie.  You start off making it the same way you always do.  You have the corn syrup, sugar, egg goop and your chopped pecans.  You know how normally all the chopped pecans float to the top and form a crust?  Well in this recipe, right when that crust is forming you add pecan halves that have been coated in sugar and honey (almost candied) on top of that.  These pecan halves sort of force those pecan bits down a bit and settle them more into the goop.  That way each bite is FULL of pecany goodness!  A pecan pie lovers dream!!!


Here's a focus on those pecan beauties!


I don't know about you, but in my family pecan pie is ALWAYS served with a scoop of vanilla ice cream.  The "goop" of the pie is almost like a sauce for the ice cream.  It's butterscotch/caramel reminiscent.  And I LOVE LOVE pie crust with ice cream.  Yummm!

Double Crunch Pecan Pie

4 eggs beaten
1/2 c. Brown sugar
1/2 tsp. Salt
1 c. Corn syrup
2 tb. Melted butter
3 tsp. Vanilla
1 c. Chopped pecans


Topping:

1/3 c. Brown Sugar
3tb. Butter
3tb. Honey
1.5 c. Pecan halves

Combine eggs, sugar, salt, corn syrup, butter, vanilla, and chopped pecans.  Pour into pie shell and bake at 350 for 35 minutes.  Combine remaining ingredients in a saucepan over low heat a few minutes just before the 35 minutes is up.  Allow the sugar to melt and everything to evenly coat the pecans.  Top pie with mixture and bake an addition 10- 15 minutes.

Monday, November 25, 2013

The Best Pumpkin Pie EVER

So here's the story with me and pumpkin pie.  I loved it when I was little little.  

Random side note completely off topic.....isn't it funny how we repeat words twice for emphasis.  Like "little little" doesn't mean 9 or 10 little.  It means like say.....4...5?  And I think people generally understand that when you say that.  It"s like when you say you "like like" somebody.  That means winky like....like break me off a piece of that like.  And everyone knows what you mean simply by saying the word twice....just a funny thought.  Anyway.....back to pie making

So I loved pumpkin pie when I was little little.  I remember looking forward to it every year (along with my grandmas stuffing) Then, suddenly I didn't like it anymore.  More than just not like....I loathed it.  The mere smell of it would make me give the stink face. The look of it grossed me out with it's not quite pudding, not quite cheesecake texture.  Watching my cousins wolf it down on Thanksgiving would put me over the edge....and I don't know why.  Seriously, I have no idea what happened. It's not like I had thrown it up....that's usually what ruins alot of foods for people but that wasn't the case here.  And then I didn't eat it for years....like at least 12 years. That was until I had to make a billion of them when I decided to start selling them.  Then, through trying lots of variations I created a recipe that everyone loved....even me.  Now pumpkin pie still isn't my first choice on Thanksgiving.  I'm more of a pecan pie girl myself (and I'll be posting a bomb recipe for that soon too!) but no other pie compares in my opinion.  I will never eat any other pumpkin pie again in  my life.....ok maybe.....but highly unlikely.

You can reference my Thanksgiving pie tips post for tips on how to easily make your pie crusts.  Then use this recipe below for the filling


The Best Pumpkin Pie EVER!

1 3/4 C. Pumpkin (15 oz can)
15 oz. can Sweetened condensed milk
2 Eggs beaten
2/3 C. Brown sugar
2  1/2 tsp. Cinnamon
1/2 tsp. Salt
1/2 tsp. Ginger
1/2 tsp. Nutmeg
!/4 tsp. Clove

Mix all ingredients together.  Pour into crusts.  Bake @425 for 15 minutes.  Reduce heat to 350 and bake for another 30-40 minutes or until the middle is set. (for me it is usually done by 30 but every oven is different)

* Makes enough filling for 1 1/2 - 2 pies.  I usually double the recipe and make 3 very full pies


* Don't be afraid to adjust the spice to YOUR taste.  I like a lot of cinnamon..you might like less. Or maybe you like more clove etc.  Taste you're batter and adjust.  If you are hesitant of eating raw egg add all your ingredients but your eggs so you can taste.  Once it is to your liking stir them in


MoMo Monday- Happy Turkey Day from a Turkey

Let me start off by saying that I have been waiting to write this post even since I started MoMo Mondays...what.....6 months ago?  It was one of the first ideas I had but I wanted to save it for the week of Thanksgiving and it has finally arrived


MoMo has many many nicknames.  There's bunny, buns, grey, Damo (Daw-mo), Shlomo, little love, and Turkey to name a few.

Why turkey?  Well look....


See it?


Perhaps you  need a comparison.  I don't mean like gobble gobble still running around turkey....I  mean sitting on your Thanksgiving table ready to be carved turkey


See it now?

Here's another.......


 Are you getting the picture yet?


It's the way she tucks in her front paws like wings and those back hips of hers look like turkey legs....thus the name Turkey was born. 


So on behalf of my little Turkey we wish you and yours a very happy Thanksgiving!  Be sure to pick up a can of turkey dinner for the furry love in your life


I'm so very thankful to have her unconditional love and cuteness.  I could do without the hairballs though.....but that's another post


Sunday, November 24, 2013

Thanksgiving Pie Tips

Back in my hustling days I used to sell food sometimes at Holidays.  Three years in a row I sold homemade pies and pumpkin rolls....and I will never do it EVER again if I can help it. But in those 3 years I baked hundreds of pies and picked up a few tricks along the way that made the whole process a little easier.  So as an ex pie slinger I present to you my......


Tip #1:  Use shortening

I know, I know....normally I'm a big believer in "butter makes everything better" I'm sure Julia Child just rolled over in her grave as I type this but this is one case in which I have to suggest skipping the butter and using shortening.  I like to use the butter flavored shortening because it gives me the best of both worlds.  Shortening is just easier to work with, a little more fool proof, and honestly in my experience actually yields a more flaky crust.  Not to mention it can be cheaper in the long run

Now you might be wondering....what recipe do I use?  You can use your tried and true if you have one and just use shortening in place of the butter.  I actually lost the recipe I had been using for years.  You would think I would have it memorized but I don't. I think I'm mentally blocking out the long nights of no sleep, pies stacked in boxes as far as the eye can see, and me shaking and on the verge of puking from exhaustion.  Not exactly fun so times like that will make you forget a simple recipe.  So this year I decided to google Ree Drummond's (The Pioneer Woman) recipe because I love her and I assumed her recipe would be good and whaddya know.....she also insists on shortening herself.  Great minds think alike! 

Here is the link to her recipe....I really liked it http://thepioneerwoman.com/cooking/2007/12/p-p-p-pie_crust_and_its_p-p-p-perfect/

Tip #2 Don't work with super duper cold dough

Yet another thing you've probably heard over and over when it comes to pie making is that it should be super cold.  I disagree.  Yes, you don't want things to start melting and cause a sticky mess but where most recipes have a standard rest time in the refrigerator or even freezer before you even think of touching it.....I prefer to start rolling right away.  If you start with cold ingredients (ice water and chilled shortening) I don't think it's  necessary.  I will put any dough I am not currently rolling in the fridge but like I said....no rest/chill beforehand.  I find super cold dough harder to work with as it is harder to roll and cracks more

Tip #3 Wax paper is your friend!!

I roll all my dough out sandwiched between 2 pieces of wax paper.  I know some people use gallon storage bags...but I'm cheap and wax paper costs less and when I was making dozens upon dozens of pies a year it was just more economical


You can put a little flour down on he dough if you are afraid it will stick.  As long as you don't make your dough too sticky you should be able to peel off the top piece of wax paper just fine.  Then place your pie tin right on top 


Flip the whole thing over and then peel off the other piece of wax paper.  This is the best method I have ever found for transferring the dough to the pan.  On the cooking shows you always see them roll it up on their rolling pin and unroll it back out over the pan......that has NEVER worked for me.

And this scene in Snow White is like the biggest lie of my childhood.....who just picks up pie dough like that????

http://youtu.be/FW_4q905XZw

Anways......it will look like this.  and see that little tear?  No biggie!  Just patch it up with excess dough on the sides


Then do your crust however you prefer whether that be cutting off the excess dough, rolling it in, fluting, or crimping.  Whatevs!  I've never been a good fluter.....you would think I would be by now but that always look pretty sad.  I just say they look "rustic".....that works right?


Now brings me to.....

Tip #4: Make them ahead of time and freeze

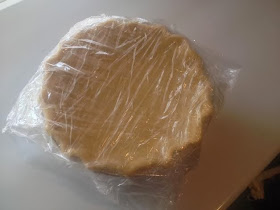
You have enough going on the day or two before Thanksgiving that you don't need to burden yourself with making your dough right then.  What I do is make them and then set them in the freezer to freeze on their own first.  When they are close to or completely frozen I stack them up with either wax paper, parchment, or freezer paper between them


Then you can either wrap them in plastic wrap like this


Or in the past I have even just wrapped them in a few layers of grocery bags and tied them up....worked just as well.  I have made all my crusts up to 2 weeks ahead of time just like this.  that way when you are ready to bake you just pull them out of the freezer, fill, and bake.  All the ease of store bought frozen crusts but from scratch....you can't beat that!

That brings us to our final tip

Tip #5  Save those scraps!

Save an scrap dough and roll them out to create cute edible decorations for your pie.  I have a set of fall cookie cutters I always use


Bake them separately and then place them on top of your baked pie....it really completes the look a


That completes my list of tips.  I hope some of these come in handy for you.  Now go forth and bake!

Tuesday, November 19, 2013

DIY Dollar Store Fall Wreath

If you've been reading my blog for any significant length of time you may have figured out that I'm a wreath making fool.  If you're new to my blog I'll let you in on a little something.....I am a wreath making fool! 

Now that we have that clear I have a terrible confession.......I never had a Fall wreath.  I know, I know.....terrible, disgusting, downright shameful!  I don't even know how I've been able to look at myself in the mirror all this time.  I have every season and every holiday covered in the wreath department.....except poor Fall.

I'm especially disappointed because I'm a root for the under dog kinda gal and Thanksgiving tends to get looked over.  It kinda got screwed getting sandwiched between holidays like Halloween and Christmas and doesn't get much energy devoted to it with decoration.  

Well, I'm happy to say that I have cleared my conscious and made things right with poor Fall/Thanksgving and finally given it it's well deserved place on my front door


I love how it turned out and the best part was it only cost $6 to make.  Everything is from the dollar store.  I think it looks just as nice as the premade ones in the craft stores that cost 4x that at least

For the background I cut the leaves off bunches and arranged them around using hot glue to hold them in place.  Don't completely plaster them flat though.  I just put dots of glue on different places of the leaf and lightly pushed it down so they would still look sort of crinkled and more real instead of an ironed flat look


Add some fall colored and a bow and your wreath is done

Monday, November 18, 2013

MoMo Monday- A Day in the Life of MoMo the Cat


6:30 am: Sit outside the bathroom door while daddy gets ready for work

7:00 am: Meow at him pathetically when he nearly steps on me even though I'm sitting in the worst spot ever

8:00 am: Meow at mommy until she wakes up and feeds me


8:15 am: Meow some more until she gives me wet food instead of the dry crap. Make a big mess while eating


8:30 am: Drink waaaaay too much water waaaay too fast after eating

9:00 am: Puke into water bowl

9:30 am: Shower


10:00: Lounge


10:30 am: Get into a fight with the area rug.

10:40 am: Win!!!

11:00: Poop

11:30 am: Sun bathe


12 pm: Pee.  Kick half the litter out of my box in the process

12:30 pm: Take a bath

1 pm: Nap


1:30 pm: Find paper to lay on

2 pm: Eat a snack

2:15 pm:  Puke half on the carpet and half on the kitchen linoleum. Do not, I repeat DO NOT move forward the 2 inches I would have to to make it all land on the easily wipeable surface

2:30 pm: Fix my hair

3 pm: Relax


3:30 pm: Drink out of the toilet even though I have a perfectly good water fountain of my very own


4 pm: Look adorable


5 pm: Sit in a box


6 pm: Doze 


6:30 pm: Get a drink of water without ever actually getting up


6:45 pm: Check the cuteness levels in the house, adjust if necessary

7:00 pm: Lay down on mommy or daddy at the most inconvenient time ever


7:30 pm: Sit on the lap top


8:00 pm: Demand a chin scratching session


8:30 pm: Evening snack. (aka whatever I can sneak off mommy and daddy's plate)


8:45 pm: Drink out of Mom or Dads cup even though my water fountain is RIGHT THERE


9:00 pm: Poop and pee while kicking out even more litter in attempt to make up for the litter mommy just swept up off the floor

10:00 pm: Lay with my parents until we all fall asleep


As you can see MoMo has a VERY busy day.  Just jam packed without a minute to spare. It's tough being a cat!


Thursday, November 14, 2013

Low Carb Chicken Zoodle Soup

If you're looking for all the same great flavors and cozy feelings that come with a big bowl of chicken noodle soup but without the gluten and carb gut....I have exactly that. Chicken zoodle soup!


If you're already following a low carb or gluten free life style you've most likely heard of or even made zucchini noodles before....but if you haven't now is your chance

You can make your zoodles using a julienne peeler, a spiral slicer, or a mandolin slicer


Whip up a pot of your favorite chicken soup.  I had some homemade broth in the freezer and emptied out my fridge of all my vegetables that were walking the line of floppy and wrinkly...onions, yellow bell pepper, a little carrot, and celery.  Along with some garlic, diced chicken, and a bay leaf I had a pot of steaming deliciousness.

Since my zoodles were so thin I didn't want to risk throwing them into the pot with the rest of the stuff and risk them turning to mush and losing all their texture

Sooo.....I decided to put a handful of the raw zoodles at the bottom of my bowl and ladled the steamy chicken soup on top and let it sit for a few minutes before I ate it to let them cook a bit without going to mush. It worked out perfectly. Another way you could do it could be to lightly saute them in a pan and then add them to your bowl 

My favorite way to eat my chicken soup is to eat it sort of Pho style with lots of condiments. Here I added sriracha, cilantro, green onion, and a little bit of soy (or coconut aminos)


 All mixed up and delicious


I wish I had bean sprouts on hand too...would have made it even better


I seriously didn't miss the pasta....and I'm not just saying that

Wednesday, November 13, 2013

Wardrobe Wednesday- Little Black Dress and Leopard Cardigan

I'm sure you've heard many times how the little black dress is one of the biggest staples every woman should have in their wardrobe.  It can be so versatile and styled in so many different ways up or down


My confession is that I didn't even own a black dress until a year and a half ago and I only wore it one way.

But that's the whole point of me starting Wardrobe Wednesdays on this blog right? To step up my style, branch out a little, and put outfits together with a little more thought than I used to.  With that in mind I decided to dig my dress out of the closet and find a way to wear it.  This is what I came up with


Dress: XI Clothing
Cardigan: Thrifted
Ankle Boots: Ross

I just can't quit the leopard these days and luckily I don't have to because it's totally in this Fall.  I was thrilled when I found the cardigan at Goodwill but I do need to swap out the buttons.  They're those horrible old lady sea shell looking ones....bleh!   I noticed my lion hair makes it look like the dress has some sort of big collar....but it's actually just a very simple sweet heart neckline.

I can't wait to find more ways to style this dress over the seasons so stay tuned!